Chevrolet Cobalt Service & Repair Manual: Component Replacement
Anti-Lock Brake System Automated Bleed Procedure
| 1. |
Raise and support vehicle. |
| 2. |
Remove all four wheel and tire assemblies. |
| 3. |
Inspect brake system for leaks and
damage. |
| 4. |
Inspect battery state of charge. |
| 5. |
Connect a suitably programmed scan
tool to DLC (Data Link Connector). |
| 6. |
Place ignition switch in On position
with engine Off. |
| 7. |
Using scan tool, establish communications
with ABS system. Select Special Functions, then select Automated
Bleed from Special Functions menu. |
| 8. |
Follow instructions displayed on scan
tool screen to bleed base brake system until desired brake pedal
height is achieved. |
| 9. |
If bleed procedure is aborted, a fault
in system exists. Diagnose and repair indicated DTC(s). |
| 10. |
When desired pedal height is achieved,
press brake pedal to inspect for firmness. |
| 12. |
Install wheel and tire assemblies,
then lower vehicle. |
| 13. |
Torque lug nuts alternately
and evenly in a criss cross pattern to 100 ft. lbs. |
| 14. |
Check master cylinder level and fill
with DOT 3 brake fluid if required. |
| 15. |
Road test vehicle while inspecting
that brake pedal remains high and firm. |
|
Hydraulic Brake System Bleed Procedure
Manual Bleeding
| 1. |
Place a clean shop cloth beneath brake
master cylinder to prevent brake fluid spills. |
| 2. |
With ignition Off and brakes cool,
deplete brake booster power reserve by applying brakes until brake
pedal effort increases significantly. |
| 3. |
If brake master cylinder bench bleeding
has been performed on this vehicle or brake pipes were disconnected
from master cylinder, proceed as follows: |
| |
a. |
With rear brake line securely installed
to master cylinder, loosen and separate front brake line from front
port of brake master cylinder. |
| |
b. |
Allow a small amount of brake fluid
to gravity bleed from open port of master cylinder. |
| |
c. |
Reconnect brake pipe to master cylinder
port and tighten securely. |
| |
d. |
Have an assistant slowly depress brake
pedal fully and maintain steady pressure on pedal. |
| |
e. |
Loosen same brake pipe to purge air
from open port of master cylinder. |
| |
f. |
Tighten brake pipe, then have assistant
slowly release brake pedal. |
| |
g. |
Wait 15 seconds, then repeat steps
(a) through (f) until all air is purged from same port of master
cylinder. |
| |
h. |
With front brake pipe securely installed
to master cylinder after all air has been purged from front port
of master cylinder, loosen and separate rear brake pipe from master
cylinder, then repeat steps (a) through (g). |
| |
i. |
After completing final master cylinder
port bleeding procedure, ensure that both of brake pipe to master
cylinder fittings are securely tightened. |
| 4. |
Fill brake master cylinder reservoir
to proper level with DOT 3 brake fluid from a clean, sealed brake
fluid container. Ensure that brake master cylinder reservoir remains
at least half full during bleeding procedure. Add fluid as needed
to maintain proper level. Clean outside of reservoir on and around
reservoir cap prior to removing cap and diaphragm. |
| 5. |
Install a suitable box end wrench onto
right rear wheel hydraulic circuit bleeder valve. |
| 6. |
Install a transparent hose over end
of inner bleeder valve. |
| 7. |
Submerge open end of transparent hose
into a transparent container partially filled with DOT 3 brake fluid
from a clean sealed brake fluid container. |
| 8. |
Have an assistant slowly depress brake
pedal fully and maintain steady pressure on pedal. |
| 9. |
Loosen bleeder valve to purge air from
wheel hydraulic circuit. |
| 10. |
Tighten bleeder valve, then have assistant
slowly release brake pedal. |
| 11. |
Wait 15 seconds, then repeat steps
8 through 11 until all air is purged from wheel hydraulic circuit. |
| 12. |
Securely tighten right rear wheel hydraulic
circuit bleeder valve after all air has been purged from right rear
hydraulic circuit. |
| 13. |
Install a suitable box end wrench onto
left front wheel hydraulic circuit bleeder valve (inboard). Install
a transparent hose over end of bleeder valve, then repeat steps
8 through 11. |
| 14. |
On models equipped w/2.0L TURBO
(LNF) and SAAB Manual 5 Speed (MU3), install a proper box-end
wrench onto left front wheel hydraulic circuit outboard bleeder
valve. Install a transparent hose over end of bleeder valve, then
repeat steps 8 through 11. |
| 15. |
On all models, securely tighten
left front wheel hydraulic circuit bleeder valve after all air has
been purged from left front hydraulic circuit. |
| 16. |
Install a proper box-end wrench onto
left rear wheel hydraulic circuit bleeder valve. Install a transparent
hose over end of bleeder valve, then repeat steps 8 through 11. |
| 17. |
Securely tighten left rear wheel hydraulic
circuit bleeder valve after all air has been purged from left rear
hydraulic circuit. |
| 18. |
Install a suitable box end wrench onto
right front wheel hydraulic circuit bleeder valve (inboard). Install
a transparent hose over end of bleeder valve, then repeat steps
8 through 11. |
| 19. |
On models equipped w/2.0L TURBO
(LNF) and SAAB Manual 5 Speed (MU3), install a proper box-end
wrench onto right front wheel hydraulic circuit outboard
bleeder valve. Install a transparent hose over end of bleeder valve,
then repeat steps 8 through 11. |
| 20. |
After completing final wheel hydraulic
circuit bleeding procedure, ensure each of six wheel hydraulic circuit
bleeder valves is properly tightened. |
| 21. |
On all models, after completing
final wheel hydraulic circuit bleeding procedure, ensure that each
of four wheel hydraulic circuit bleeder valves are securely tightened. |
| 22. |
Fill brake master cylinder reservoir
to maximum fill level with DOT 3 brake fluid from a clean sealed
brake fluid container. |
| 23. |
Slowly depress and release brake pedal. |
| 24. |
If brake pedal feels spongy, repeat
bleeding procedure. |
| 25. |
If brake pedal still feels spongy,
brake hydraulic system will need to be pressure bleed as outlined
under, "Pressure Bleed." If brake pedal is still spongy, hydraulic
brake system will need to be diagnosed and repaired. |
| 26. |
Turn ignition key On, with engine Off.
Check if brake system warning lamp remains illuminated. If brake
warning lamp remains On, brake hydraulic system will need to be
diagnosed and repaired. |
|
Pressure Bleed
| 1. |
Place a clean shop cloth beneath brake
master cylinder to prevent brake fluid spills. |
| 2. |
With ignition Off and brakes cool,
apply brakes until brake pedal effort increases significantly in
order to deplete brake booster power reserve. |
| 3. |
If brake master cylinder bench bleeding
has been performed on this vehicle or brake pipes were disconnected
from master cylinder, proceed as follows: |
| |
a. |
With rear brake line securely installed
to master cylinder, loosen and separate front brake line from front
port of brake master cylinder. |
| |
b. |
Allow a small amount of brake fluid
to gravity bleed from open port of master cylinder. |
| |
c. |
Reconnect brake pipe to master cylinder
port and tighten securely. |
| |
d. |
Have an assistant slowly depress brake
pedal fully and maintain steady pressure on pedal. |
| |
e. |
Loosen same brake pipe to purge air
from open port of master cylinder. |
| |
f. |
Tighten brake pipe, then have assistant
slowly release brake pedal. |
| |
g. |
Wait 15 seconds, then repeat steps
a through f until all air is purged from same port of master cylinder. |
| |
h. |
With front brake pipe securely installed
to master cylinder after all air has been purged from front port
of master cylinder, loosen and separate rear brake pipe from master
cylinder, then repeat steps a through g. |
| |
i. |
After completing final master cylinder
port bleeding procedure, ensure that both of brake pipe to master
cylinder fittings are securely tightened. |
| 4. |
Fill brake master cylinder reservoir
to proper level with DOT 3 brake fluid from a clean, sealed brake
fluid container. Ensure that brake master cylinder reservoir remains
at least half full during bleeding procedure. Add fluid as needed
to maintain proper level. Clean outside of reservoir on and around
reservoir cap prior to removing cap and diaphragm. |
| 5. |
Install tool No. j44894-A, or equivalent,
to brake master cylinder reservoir. |
| 6. |
Check brake fluid level in tool No.
j29532, or equivalent. Add DOT 3 brake fluid from a clean sealed
brake fluid container as required to bring level to approximately
half full point. |
| 7. |
Connect tool No. j29532 to tool No.
j44894-A, or equivalents. |
| 8. |
Charge tool No. j29532, or equivalent,
air tank to 25 to 30 psi. |
| 9. |
Open tool No. j29532, or equivalent,
fluid tank valve to allow pressurized brake fluid to enter brake
system. |
| 10. |
Wait approximately 30 seconds, then
inspect entire hydraulic brake system for external brake fluid leaks.
If any external brake fluid leaks are present, brake hydraulic system
will need to be diagnosed and repaired. |
| 11. |
Install a suitable box end wrench onto
right rear wheel hydraulic circuit bleeder valve. |
| 12. |
Install a transparent hose over end
of bleeder valve. |
| 13. |
Submerge open end of transparent hose
into a transparent container partially filled with DOT 3 brake fluid
from a clean sealed brake fluid container |
| 14. |
Loosen bleeder valve to purge air from
wheel hydraulic circuit. Allow fluid to flow until air bubbles stop
flowing from bleeder, then tighten bleeder valve. |
| 15. |
Securely tighten right rear wheel hydraulic
circuit bleeder valve after all air has been purged from right rear
hydraulic circuit. |
| 16. |
Install a suitable box-end wrench onto
left front wheel hydraulic circuit bleeder valve (inboard). Install
a transparent hose over end of bleeder valve, then repeat steps
13 and 14. |
| 17. |
On models equipped w/2.0L TURBO
(LNF) and SAAB Manual 5 Speed (MU3), install a proper box-end
wrench onto left front wheel hydraulic circuit outboard bleeder
valve. Install a transparent hose over end of bleeder valve, then
repeat steps 13 and 14. |
| 18. |
On all models, securely tighten
left front wheel hydraulic circuit bleeder valve after all air has
been purged from left front hydraulic circuit. |
| 19. |
Install a suitable box end wrench onto
left rear wheel hydraulic circuit bleeder valve. Install a transparent
hose over end of bleeder valve, then repeat steps 13 and 14. |
| 20. |
Securely tighten left rear wheel hydraulic
circuit bleeder valve after all air has been purged from left rear
hydraulic circuit. |
| 21. |
Install a suitable box end wrench onto
right front wheel hydraulic circuit bleeder valve (inboard). Install
a transparent hose over end of bleeder valve, then repeat steps
13 and 14. |
| 22. |
On models equipped w/2.0L TURBO
(LNF) and SAAB Manual 5 Speed (MU3), install a proper box-end
wrench onto right front wheel hydraulic circuit outboard
bleeder valve. Install a transparent hose over end of bleeder valve,
then repeat steps 13 and 14. |
| 23. |
After completing final wheel hydraulic
circuit bleeding procedure, ensure each of six wheel hydraulic circuit
bleeder valves is properly tightened. |
| 24. |
On all models, after completing
final wheel hydraulic circuit bleeding procedure, ensure that each
of four wheel hydraulic circuit bleeder valves are securely tightened. |
| 25. |
Close tool No. j29532, or equivalent,
fluid tank valve, then disconnect tool No. j29532 from J44894-A,
or equivalents. |
| 26. |
Remove tool No. j44894-A, or equivalent,
from brake master cylinder reservoir. |
| 27. |
Fill brake master cylinder reservoir
to maximum fill level with DOT 3 brake fluid from a clean sealed
brake fluid container. |
| 28. |
Slowly depress and release brake pedal. |
| 29. |
If brake pedal feels spongy, proceed
as follows: |
| |
a. |
Check brake hydraulic system for external
leaks and repair system as required. |
| |
b. |
Perform anti lock brake system bleed
procedure as outlined under, "Anti-Lock Brake System Automated Bleed
Procedure." |
| 30. |
Turn ignition key On, with engine Off.
Check if brake system warning lamp remains illuminated. If brake
warning lamp remains On, brake hydraulic system will need to be
diagnosed and repaired. |
|
Steering Angle Sensor Centering
| Centering of steering angle sensor
may be required after certain service procedures are performed. Some of
these procedures are steering gear replacement, steering column replacement,
steering angle sensor replacement, intermediate shaft replacement, EBCM
replacement or collision or physical damage. |
| 1. |
Center steering wheel with wheels facing
forward. |
| 2. |
Perform special functions steering
position sensor calibration, using a suitably programmed scan tool. |
|
Brake Pressure Modulator Valve (BPMV)
| To prevent equipment damage, never
connect or disconnect wiring harness connection from the EBCM and EBTCM
with the ignition switch in the ON position. |
| The area around the EBCM must
be free from loose dirt to prevent contamination of dissembled ABS components. |
Removal
| 1. |
Place ignition switch in Off position. |
| 2. |
Remove cover from engine control module
(ECM). |
| 3. |
Clean EBCM to brake pressure modulator
valve (BPMV) area of any accumulated dirt and foreign material. |
| 4. |
Disconnect electrical connector from
EBCM. |
| 5. |
Disconnect and cap LR and RR brake
line fittings from BPMV, Fig. 1. |
| 6. |
Disconnect and cap LF and RF brake
line fittings from BPMV, Fig. 2. |
| 7. |
Disconnect and cap master cylinder
primary and secondary brake line fitting from BPMV, Fig.
3. |
| 8. |
Remove BPMV bolt, Fig. 4. |
| 9. |
Carefully remove BPMV from BPMV bracket
insulators by pulling straight upward, Fig. 5. |
| 10. |
Remove EBCM, if required, as outlined
in, "Electronic Brake Control Module (ECBM)." |
|
Installation
| 1. |
Install EBCM, if required, as outlined
in, "Electronic Brake Control Module (ECBM)." |
| 2. |
Install BPMV to BPMV bracket until
mounting pins are fully inserted in bracket insulators, Fig.
5. |
| 3. |
Install BPMV bolt, then torque
to 97 inch lbs., Fig. 4. |
| 4. |
Connect master cylinder primary and
secondary brake line fitting to BPMV, then torque to 14 ft.
lbs., Fig. 3. |
| 5. |
Connect LF and RF brake line fittings
to BPMV, then torque to 14 ft. lbs., Fig. 2. |
| 6. |
Connect LR and RR brake line fittings
to BPMV, then torque to 14 ft. lbs., Fig. 1. |
| 7. |
Connect electrical connector to EBCM. |
| 8. |
Install cover to engine control module
(ECM). |
| 9. |
Program EBCM, using a suitably programmed
scan tool. |
| 10. |
Bleed hydraulic brake system as described
under, "Hydraulic Brake System Bleed." |
| 11. |
Perform Diagnostic System Check, using
a suitably programmed scan tool. |
| 12. |
Place ignition switch in Off position. |
| 13. |
If pedal feels spongy, perform auto
bleed procedure as described under, "Anti-Lock Brake System Automated
Bleed Procedure." |
|
Electronic Brake Control Module (ECBM)
| To prevent equipment damage, never
connect or disconnect wiring harness connection from the EBCM and EBTCM
with the ignition switch in the ON position. |
| The area around the EBCM must
be free from loose dirt to prevent contamination of dissembled ABS components. |
Removal
| 1. |
Place ignition switch in Off position. |
| 2. |
Remove cover from engine control module
(ECM). |
| 3. |
Clean EBCM to brake pressure modulator
valve (BPMV) area of any accumulated dirt and foreign material. |
| 4. |
Disconnect electrical connector from
EBCM. |
| 5. |
Remove EBCM bolts, Fig. 6. |
| 6. |
Separate EBCM from BPMV by carefully
pulling apart. Do not pry components apart, Fig. 7. |
| 7. |
Remove EBCM O-ring seals and discard,
Fig. 8. |
|
Installation
| 1. |
Install new EBCM O-ring seals, Fig.
8. |
| 2. |
Install EBCM to BPMV, Fig.
7. |
| 3. |
Install EBCM bolts, then torque
to 27 inch lbs., Fig. 6. |
| 4. |
Connect electrical connector to EBCM. |
| 5. |
Install cover to engine control module
(ECM). |
| 6. |
Perform EBCM programming and set up
procedures, using a suitably programmed scan tool. |
|
Electronic Traction Control Switch
Removal
| 1. |
Remove steering column opening filler
assembly, pulling away from instrument panel retainer, then disconnect
electrical connector for trunk release, Fig. 9. |
| 2. |
Remove electronic traction control
switch, pulling away from instrument panel retainer, then disconnect
electrical connector, Fig. 10. |
|
Installation
| 1. |
Connect and install electronic traction
control switch, Fig. 10. |
| 2. |
connect and install steering column
opening filler assembly, Fig. 9. |
|
Steering Angle Sensor
Removal
| 1. |
With vehicle wheels facing straight
ahead, secure steering wheel utilizing steering column anti-rotation
pin, steering column lock, or a strap to prevent rotation. |
| 2. |
Remove intermediate steering shaft
bolt, Fig. 11. |
| 3. |
Disconnect intermediate steering shaft. |
| 4. |
Disconnect and remove steering angle
sensor. |
|
Installation
| 1. |
Connect and install steering angle
sensor. |
| 2. |
Connect intermediate steering shaft. |
| 3. |
Install intermediate steering shaft
bolt, then torque to 25 ft. lbs., Fig. 11. |
| 4. |
Unlock steering column. |
| 5. |
Center steering angle sensor as outlined
under "Steering Angle Sensor Centering." |
|
Wheel Speed Sensor
| Both front and rear wheel speed
sensors and rings are integral with hub and bearing assemblies. |
Removal
Front
| 1. |
Raise and support vehicle. |
| 2. |
Remove wheel and tire assembly. |
| 3. |
Insert a punch or drift in cooling
fins of brake rotor and against brake caliper mounting bracket,
Fig. 12. |
| 4. |
on models equipped w/Brembo brake,
have an assistant apply brakes. |
| 5. |
On all models, remove wheel
drive shaft nut from wheel drive shaft and discard. |
| 6. |
Separate wheel drive shaft from steering
knuckle, using tool No. j 28733-B, or equivalent, Fig.
13. |
| 7. |
Remove brake rotor as follows: |
| |
a. |
On models without Turbo, install
a C clamp over body of brake caliper, with C clamp ends against
rear of caliper body and outboard disc brake pad, compress piston
into caliper bore just enough to allow caliper to slide away from
rotor, Fig. 14. |
| |
c. |
On all models, remove brake
caliper bracket bolts. |
| |
d. |
Without disconnecting hydraulic brake
flexible hose, remove brake caliper assembly and support from chassis
with heavy mechanics wire, or equivalent. |
| |
e. |
Remove and discard brake rotor retainers. |
| |
f. |
Remove brake rotor, Fig.
15. |
| 8. |
Disconnect speed sensor electrical
connector. |
| 9. |
Remove wheel bearing and hub retaining
bolts. |
| 10. |
Remove wheel bearing and hub assembly,
Fig. 16. |
|
Rear
| 1. |
Raise and support vehicle. |
| 2. |
Remove wheel and tire assembly. |
| 3. |
On models w/rear disc brakes,
remove brake rotor as follows: |
| |
a. |
Install a C clamp over body of brake
caliper, with C clamp ends against rear of caliper body and outboard
disc brake pad, compress piston into caliper bore .039 inch of travel
only, Fig. 17. |
| |
b. |
Remove C clamp from caliper. |
| |
c. |
Remove caliper bracket bolts. |
| |
d. |
Without disconnecting hydraulic brake
flexible hose, remove brake caliper assembly and support from chassis
with heavy mechanics wire, or equivalent. |
| 4. |
Disconnect electrical connector from
wheel speed sensor. |
| 5. |
Remove wheel bearing hub assembly mounting
nuts, Fig. 18. |
| 6. |
Remove wheel bearing hub assembly and
disc brake backing plate from rear axle assembly. |
| 7. |
On models w/rear drum brakes,
remove brake drum as follows: |
| |
a. |
Remove and discard brake drum retainers,
Fig. 19. |
| 8. |
Remove plug from drum brake actuator
access hole in backing plate. |
| 9. |
Support brake backing plate by actuator
access hole from chassis with heavy mechanics wire, or equivalent,
Fig. 20. |
| 10. |
Disconnect wheel bearing hub electrical
connector. |
| 11. |
Remove wheel bearing hub assembly mounting
nuts. |
| 12. |
Remove wheel bearing hub assembly from
rear axle assembly and brake backing plate, Fig. 21. |
|
Installation
Front
| 1. |
Install wheel bearing and hub assembly,
Fig. 16. |
| 2. |
Install new wheel bearing and hub retaining
bolts, then torque to 85 ft. lbs. |
| 3. |
Connect speed sensor electrical connector. |
| 4. |
Install brake rotor as follows: |
| |
a. |
Thoroughly clean any rust or corrosion
from mounting surface of brake rotor to wheel bearing and hub, using
tool No. j 41013, or equivalent. |
| |
c. |
Install brake caliper and brake caliper
bracket as an assembly to suspension knuckle. |
| |
d. |
Thoroughly clean any residue from bolt
threads or mounting bracket bolt holes with denatured alcohol, or
equivalent, and allow to dry. |
| |
e. |
Apply thread locker, or equivalent,
to bracket bolts, and allow cure approximately 10 minutes. |
| |
f. |
Install two brake caliper bracket bolts,
then torque to 85 ft. lbs. On models w/Turbo, torque
to 96 ft. lbs. |
| 5. |
Install front wheel drive shaft nut.
Insert a drift on a flat-bladed tool into caliper and rotor to prevent
rotor from turning. |
| 6. |
on models equipped w/Brembo brake,
have an assistant apply brakes. |
| 7. |
On all models, install drive
axle nut, then torque to 155 ft. lbs. On models w/Turbo,
torque to 159 ft. lbs. |
| 8. |
Install wheel and tire assembly, then
torque lug nuts alternately and evenly in a criss cross pattern
to 100 ft. lbs. |
|
Rear
| 1. |
On models w/rear drum brakes,Install
wheel bearing hub assembly to rear axle assembly and brake backing
plate, Fig. 21. |
| 2. |
Install wheel bearing hub assembly
mounting nuts, then torque nuts evenly to 33 ft. lbs. in
a cross-pattern, plus additional 30 degrees. |
| 3. |
Connect wheel bearing hub electrical
connector. |
| 4. |
Remove Support from brake backing,
Fig. 20. |
| 5. |
Install plug to drum brake actuator
access hole in backing plate. |
| 6. |
Install brake drum as follows: |
| |
c. |
Apply brakes two or three times to
seat and center brake shoes on brake drum. |
| 7. |
On models w/rear disc brakes,Install
wheel bearing hub assembly and disc brake backing plate to rear
axle assembly. |
| 8. |
Install wheel bearing hub assembly
mounting nuts, then torque nuts evenly to 33 ft. lbs. in
a cross-pattern, plus additional 30 degrees, Fig. 18. |
| 9. |
Connect electrical connector to wheel
speed sensor. |
| 10. |
Install brake rotor as follows: |
| |
a. |
Thoroughly clean any rust or corrosion
from mating surface and mounting surface of brake rotor, using tool
No. j 41013, or equivalent. |
| |
c. |
Install brake caliper assembly. |
| |
d. |
Install caliper bracket bolts, then
torque to 85 ft. lbs. |
| 11. |
On all models, install wheel
and tire assembly, then torque lug nuts alternately and evenly
in a criss cross pattern to 100 ft. lbs. |
|
Yaw Sensor w/Lateral Accelerometer
Removal
| 1. |
Place ignition switch in Off position. |
| 2. |
Remove right front seat as follows: |
| |
a. |
Remove front seat assembly bolts. |
| |
b. |
Disconnect drivers seat assembly. |
| |
c. |
Remove right front seat, tilt seat
forward to release front of seat tracks. |
| 3. |
Remove right side front carpet retainer,
Fig. 22. |
| 4. |
Lift floor carpet to access yaw rate
sensor. |
| 5. |
Disconnect yaw rate sensor electrical
connector. |
| 6. |
Remove yaw rate sensor lateral accelerometer
nuts, Fig. 23. |
| 7. |
Remove yaw rate sensor. |
|
Installation
| 1. |
Install yaw rate sensor. |
| 2. |
Install yaw rate sensor lateral accelerometer
nuts, then torque to 89 inch lbs., Fig. 23. |
| 3. |
Connect yaw rate sensor electrical
connector. |
| 4. |
Position floor carpet. |
| 5. |
Install right side front carpet retainer,
Fig. 22. |
| 6. |
Install right front seat as follows: |
| |
a. |
Install right front seat. |
| |
b. |
Connect drivers seat assembly. |
| |
c. |
Install front seat assembly bolts,
then torque to 22 ft. lbs. |
| 7. |
Perform steering angle sensor calibration
as described under, "Steering Angle Sensor Centering." |
| 8. |
Perform system check vehicle, using
a suitably programmed scan tool. |
|
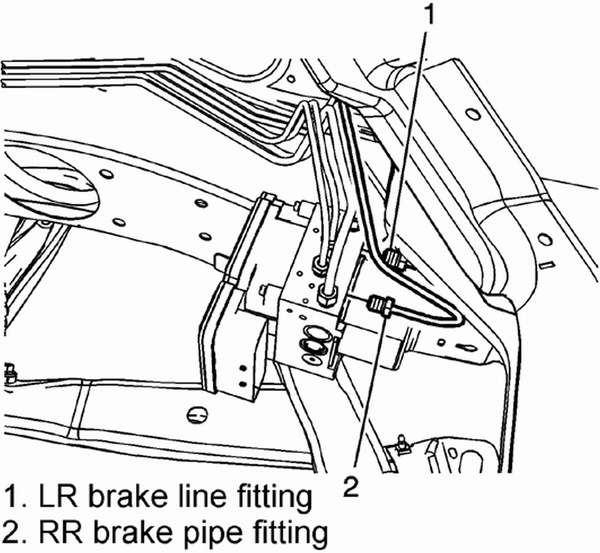
Fig. 1 Rear brake line fitting removal from BPMV
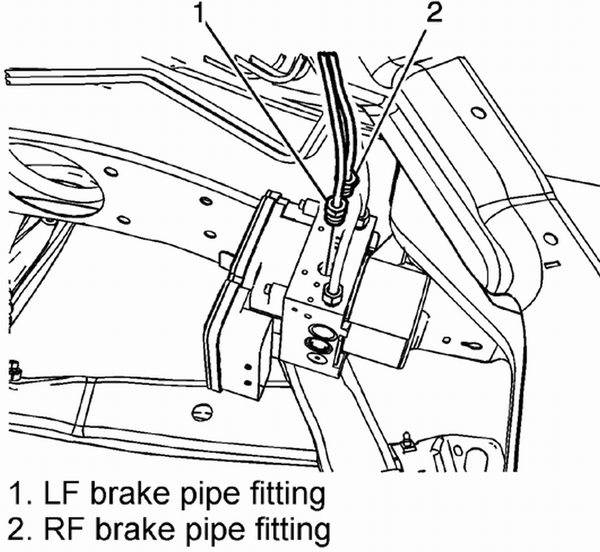
Fig. 2 Front brake line fitting removal from BPMV
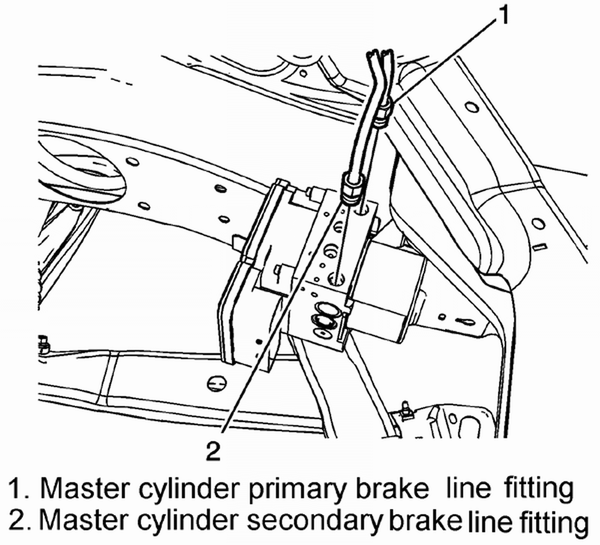
Fig. 3 Master cylinder brake line fitting removal from BPMV
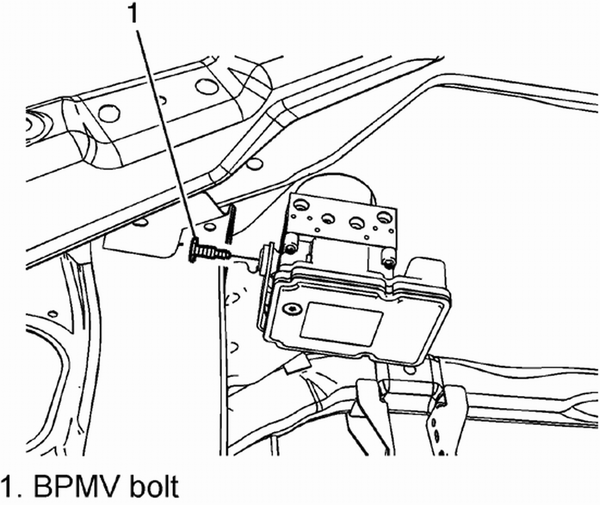
Fig. 4 BPMV bolt removal
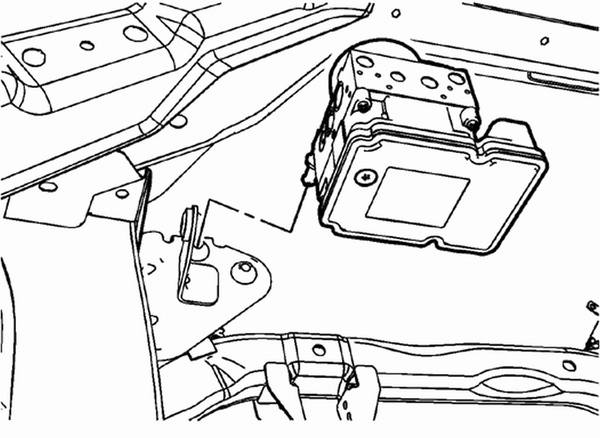
Fig. 5 BPMV replacement
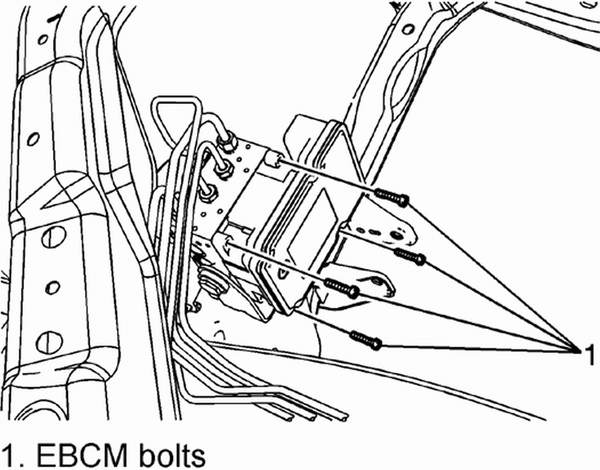
Fig. 6 EBCM bolt removal
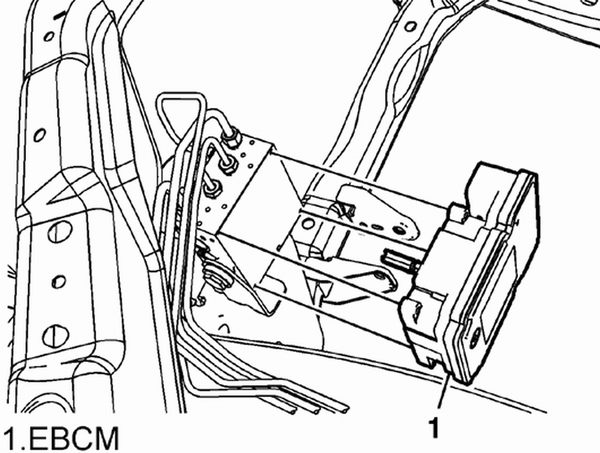
Fig. 7 EBCM replacement
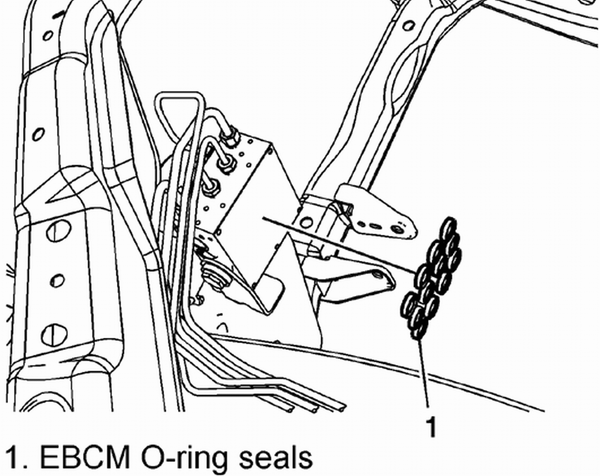
Fig. 8 EBCM O-ring seals replacement
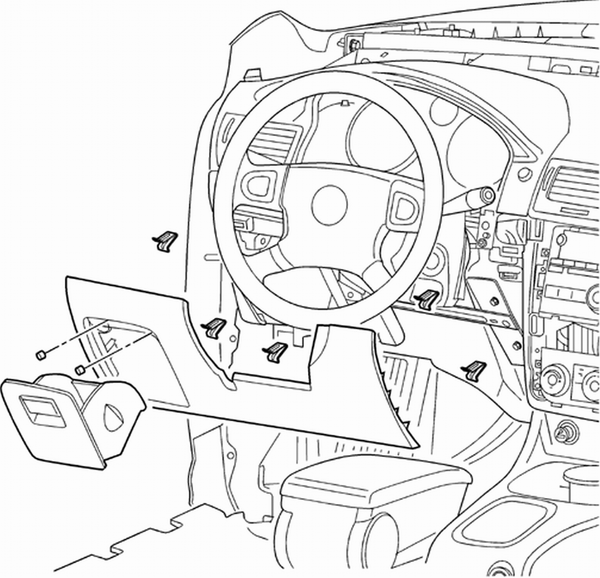
Fig. 9 Steering column opening filler assembly replacement
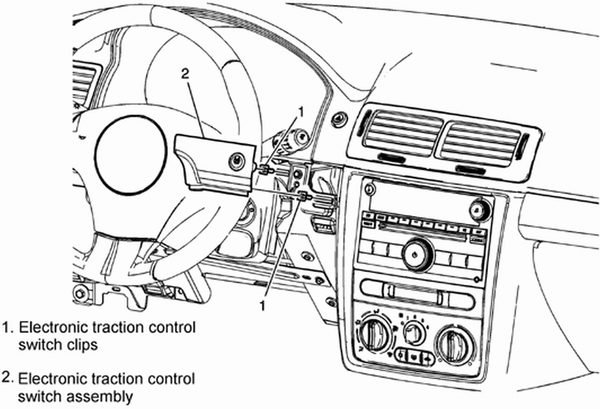
Fig. 10 Electronic traction control switch removal
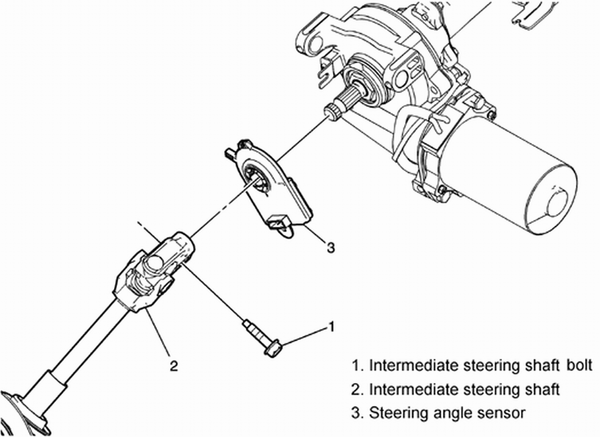
Fig. 11 Steering angle sensor replacement
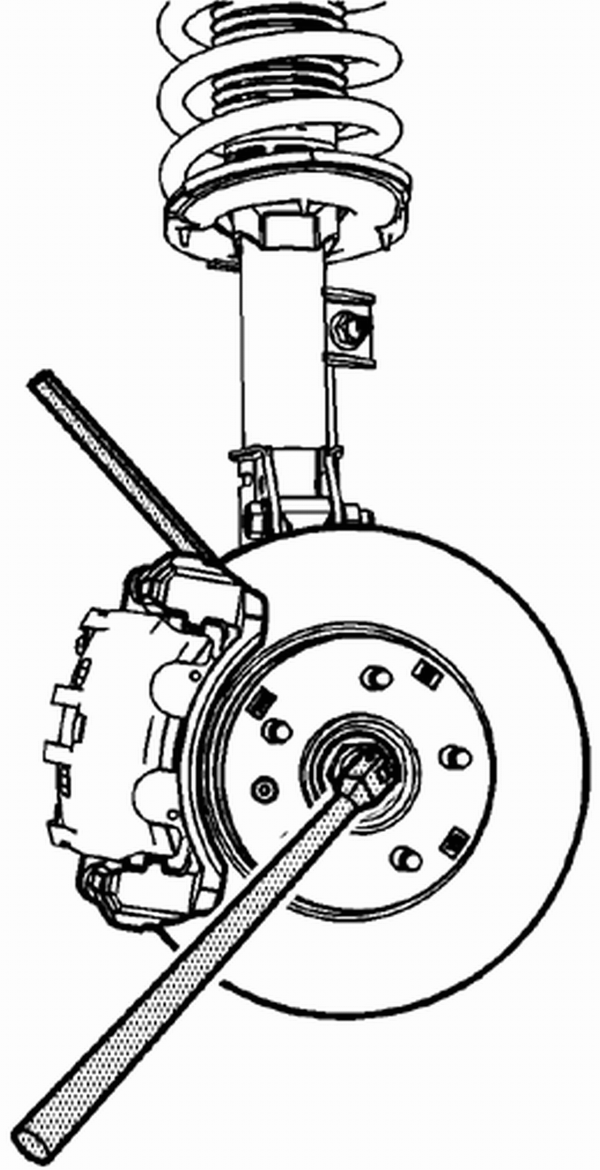
Fig. 12 Drive shaft nut removal
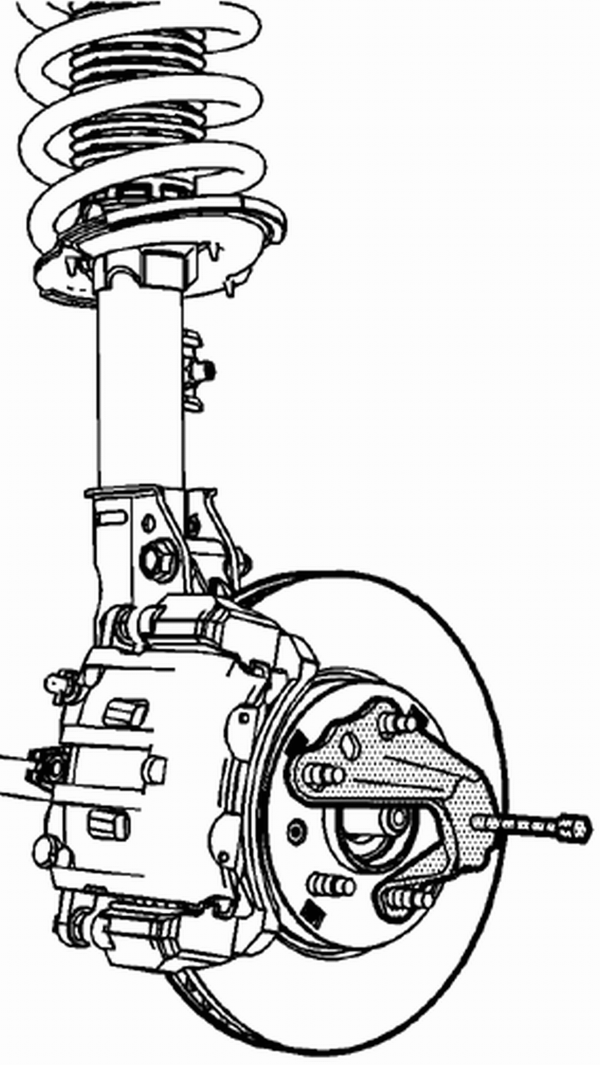
Fig. 13 Drive shaft from knuckle removal
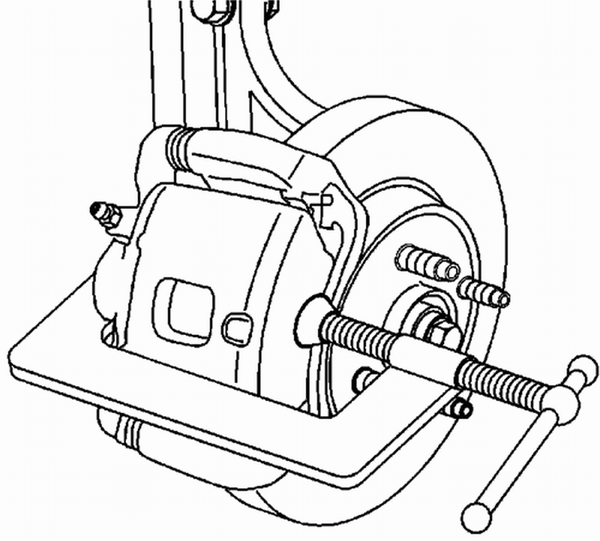
Fig. 14 Compress piston into caliper bore
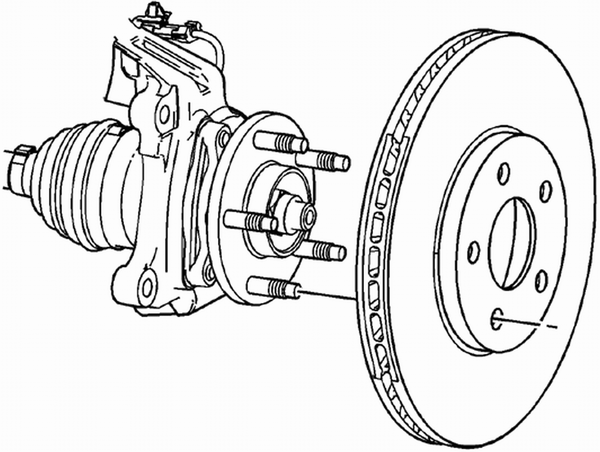
Fig. 15 Brake rotor removal
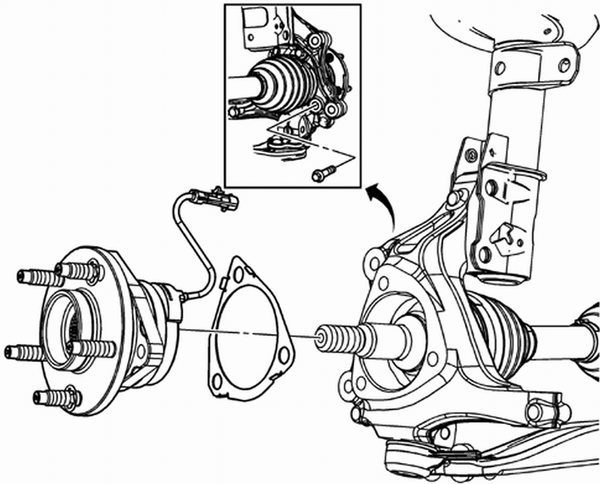
Fig. 16 Wheel bearing hub assembly replace
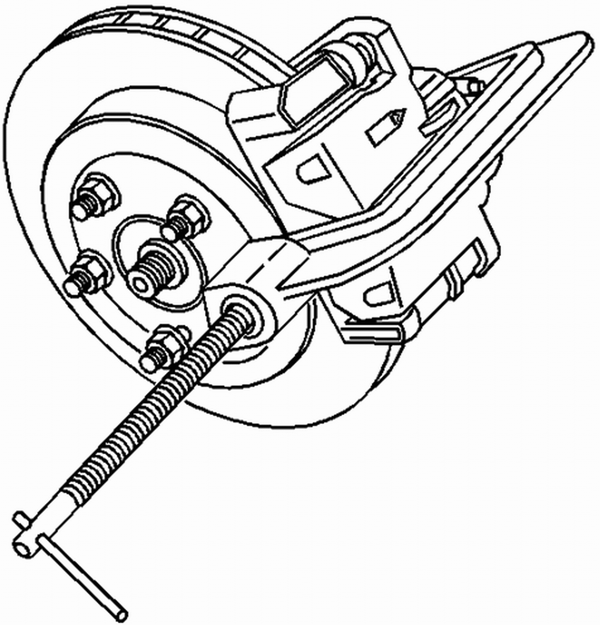
Fig. 17 C clamp over body of brake caliper
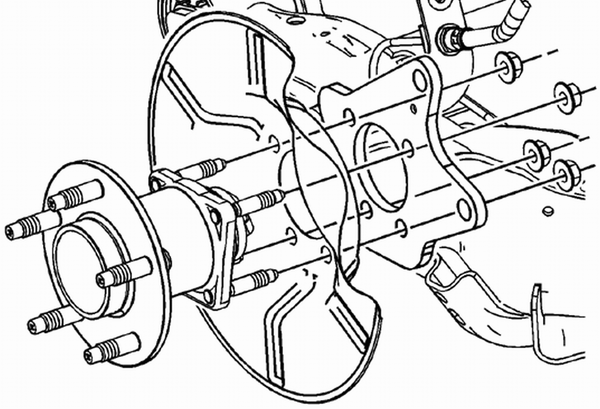
Fig. 18 Rear disc wheel bearing hub assembly mounting nut removal
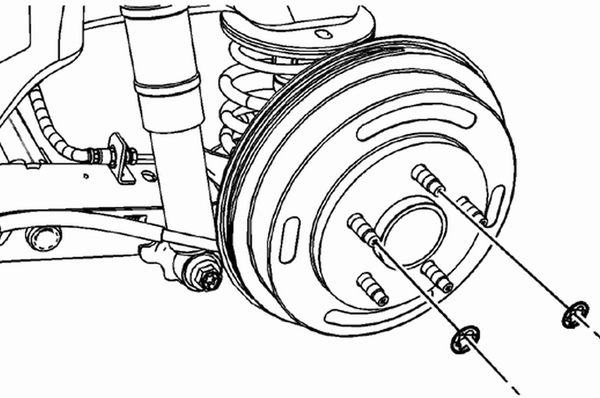
Fig. 19 Brake drum retainer removal
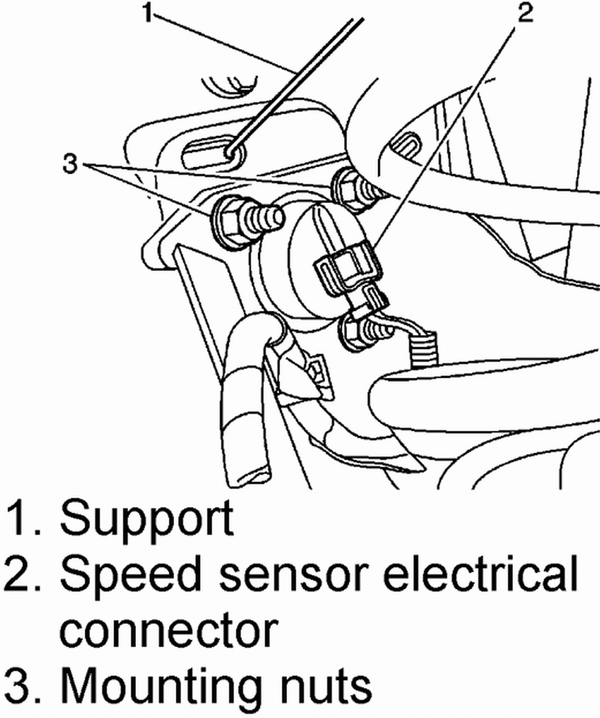
Fig. 20 Rear drum brake backing plate support
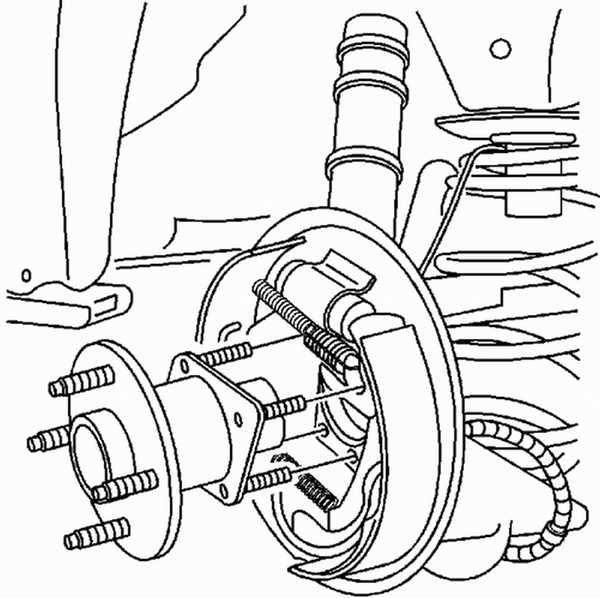
Fig. 21 Wheel bearing hub replacement
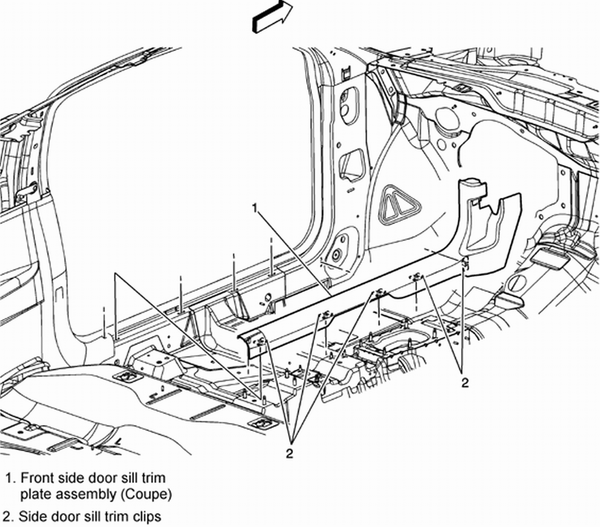
Fig. 22 Front carpet retainer removal
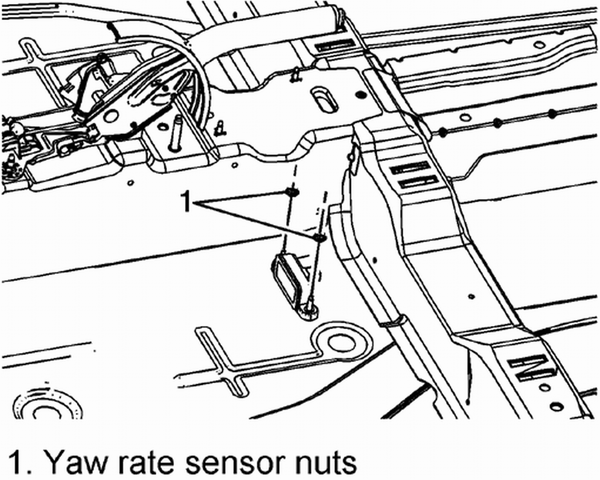
Fig. 23 Yaw rate sensor nut removal
The VSES (Vehicle Stability Enhancement
System) adds an additional level of vehicle control to the EBCM (Electronic
Brake Control Module). The EBCM controls the system functions and det ...


 Description
